Installation of CUDA Drivers In An AWS Datacenter
This guide is basically the commands with which a CUDA code ran successfully using the GPU of an AWS EC2 instance.
-
EC2 Instance: p3.2xlarge
-
Operating System: Ubuntu 20.04
Installation
- Connect to your EC2 instance through SSH:
ssh user@ip
- Install drivers for ubuntu
sudo apt install ubuntu-drivers-common
ubuntu-drivers devices
- Install gcc
sudo apt install gcc
- Confirm you have an Nvidia capable GPU:
lspci | grep -i nvidia
If successful, it should output something like:
00:1e.0 3D controller: NVIDIA Corporation GV100GL [Tesla V100 SXM2 16GB] (rev a1)
- Install linux headers:
sudo apt-get install linux-headers-$(uname -r)
- Go to this link and choose accordingly. In this case I chose:
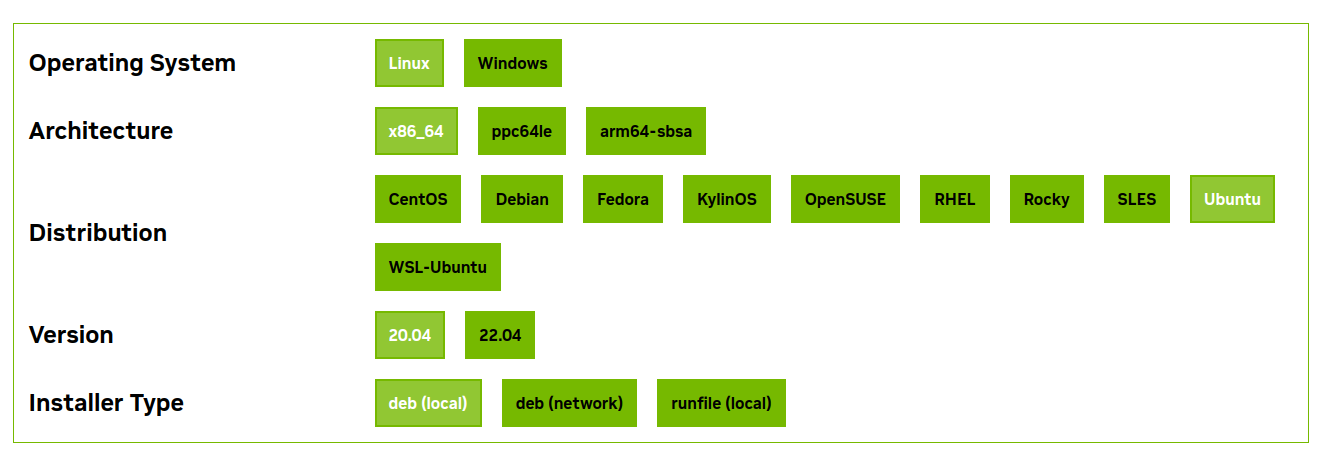
*Note: you can run uname -m to get the architecture of the instance and lsb_release -a to get the version of Ubuntu.
- That page will provide you the link so that you download the CUDA toolkit package. For example, after providing the info in the page, I proceeded with:
wget https://developer.download.nvidia.com/compute/cuda/repos/ubuntu2004/x86_64/cuda-ubuntu2004.pin
sudo mv cuda-ubuntu2004.pin /etc/apt/preferences.d/cuda-repository-pin-600
wget https://developer.download.nvidia.com/compute/cuda/12.3.1/local_installers/cuda-repo-ubuntu2004-12-3-local_12.3.1-545.23.08-1_amd64.deb
sudo dpkg -i cuda-repo-ubuntu2004-12-3-local_12.3.1-545.23.08-1_amd64.deb
sudo cp /var/cuda-repo-ubuntu2004-12-3-local/cuda-*-keyring.gpg /usr/share/keyrings/
- Update so that your new repo can be installed with apt-get
sudo apt-get update
- Install it
sudo apt-get -y install cuda-toolkit-12-3
- Install CUDA drivers
sudo apt-get install -y cuda-drivers
- Reboot the system. When you are on an EC2 instance and you reboot, the connection will be lost. Wait a few seconds and perform the ssh command to re-connect to the rebooted system.
sudo reboot
ssh user@ip
- Export the cuda binary location to the PATH
export PATH=/usr/local/cuda/bin:$PATH
- Reload the bash profile to apply the changes
source ~/.bashrc
- Install other packages:
sudo update-alternatives --config x86_64-linux-gnu_gl_conf
sudo apt-get install linux-headers-$(uname -r)
sudo apt-get install nvidia-gds
- Reboot the system
sudo reboot
- Check the status of the Nvidia daemon:
systemctl status nvidia-persistenced
It should output something like:
● nvidia-persistenced.service - NVIDIA Persistence Daemon
     Loaded: loaded (/lib/systemd/system/nvidia-persistenced.service; enabled; vendor preset: enabled)
     Active: active (running) since Mon 2023-12-11 22:09:12 UTC; 33s ago
   Main PID: 591 (nvidia-persiste)
      Tasks: 1 (limit: 73511)
     Memory: 796.0K
     CGroup: /system.slice/nvidia-persistenced.service
             └─591 /usr/bin/nvidia-persistenced --verbose

Warning: some journal files were not opened due to insufficient permissions.
- Check for CUDA links:
update-alternatives --display cuda
- Check the status of the GPU management system:
nvidia-smi
If everything’s ok, it should show:
Mon Dec 11 22:10:22 2023
+---------------------------------------------------------------------------------------+
| NVIDIA-SMI 545.23.08              Driver Version: 545.23.08    CUDA Version: 12.3     |
|-----------------------------------------+----------------------+----------------------+
| GPU  Name                 Persistence-M | Bus-Id        Disp.A | Volatile Uncorr. ECC |
| Fan  Temp   Perf          Pwr:Usage/Cap |         Memory-Usage | GPU-Util  Compute M. |
|                                         |                      |               MIG M. |
|=========================================+======================+======================|
|   0  Tesla V100-SXM2-16GB           On  | 00000000:00:1E.0 Off |                    0 |
| N/A   35C    P0              23W / 300W |      5MiB / 16384MiB |      0%      Default |
|                                         |                      |                  N/A |
+-----------------------------------------+----------------------+----------------------+

+---------------------------------------------------------------------------------------+
| Processes:                                                                            |
|  GPU   GI   CI        PID   Type   Process name                            GPU Memory |
|        ID   ID                                                             Usage      |
|=======================================================================================|
|    0   N/A  N/A      1023      G   /usr/lib/xorg/Xorg                            4MiB |
+---------------------------------------------------------------------------------------+
- Perform another display action:
nvidia-smi -a
If everything’s ok, it should print quite extensive specs about the GPU.
- Enable the persistence mode for the nvidia gpu:
nvidia-smi -pm 1
If everything’s okay, it should say something like:
Persistence mode is already Enabled for GPU 00000000:00:1E.0.
All done.
- Compile the code on a file named
hello1.cu(this could be any .cu code you want):
nvcc -gencode arch=compute_70,code=sm_70 -o hello1 hello1.cu
*Note: the arch=compute_70,code=sm_70 argument comes from here: go to this link, look for CUDA-Enabled Datacenter Products > Nvidia V100, and you will see Computing Capability of 7.0. That’s why the argument goes like arch=compute_70,code=sm_70 for this Tesla V100 GPU.
- Run the code:
sudo ./hello1
If the code runs as expected, then the output is:
Hello, world from the device!
Hello, world from the device!
Hello, world from the device!
Hello, world from the device!
Hello, world from the device!
Hello, world from the device!
Hello, world from the device!
Hello, world from the device!
Hello, world from the device!
Hello, world from the device!
Apendix
The code hello1.cu:
#include <stdio.h>

__global__ void myKernel()
{
  printf("Hello, world from the device!\n");
}

int main()
{
  myKernel<<<1,10>>>();
  cudaDeviceSynchronize();
}